


COLORADO URBAN WILDLIFE PHOTO CLUB
PHOTO RELATED ARTICLES
| St. Vrain State Park, CO | Texas Wildflowers | Bighorn Sheep in Dubois, WY |
| Fall Color | Grizzly Bears | Migration |
| Tanglewood Trail | Costa Rica | A Given Day - Orkney and Shetland Islands |
The State of Colorado has over 40 jewels in the State Park system. One of my favorites for photography is Barbour Ponds, which is now officially called St. Vrain State Park. This state park is the one that is visible as you drive I-25 at the SH 119 interchange (exit number 240). The park is located just west of I 25 and north of SH 119. During the summer the campsites are full of fishermen (the fishing is supposed to be very good!) and the ponds have many pelicans, geese, a large variety of ducks and other waterfowl. This park includes four ponds and is on the St. Vrain River.
My favorite time of year for St. Vrain (Barbour Ponds) is winter. There are few, if any fishermen and instead of waterfowl you have Bald Eagles and hawks to keep you company. At sunrise it is a great shot of frozen ponds and snow covered Longs Peak in the background. The winter has such spectacular sunrises and the color reflected off the ice enhances the photograph. I have spotted many deer foraging in the pond area just before dawn, and then they seem to vanish as the winter sun rises. It is quiet and peaceful during the winter months; often I am the only person in the park.
During the summer the noise of the interstate can be distracting while at Barbour Ponds, and is the reason I will not park my RV there. Peace and quiet are a requirement for me to sleep. During the summer the campgrounds are full of campers; this is close enough to Denver to make an easy getaway for the weekend. It is only 30 miles north on I-25 to get to some of the best warm water fishing in northern Colorado. I still enjoy my trip to the area as a day trip, and I always find many subjects to photograph. In the spring there is pond scum to play with and the antics of birds finding a mate and getting their nest ready. The bridges in this area have been providing support for many Swallows. I can sit on the banks of the Saint Vrain River for hours watching them build the mud nest and later take care of their young. You will find other nesting birds here, meadowlark, and red winged blackbirds and once I was fortunate to discover a humming bird nest.
Springtime in Texas means many things to many people. To nature photographers it means wildflowers. Although wildflowers bloom all year round in parts of this large state, Texas is famous nation-wide for the colorful blooms that usher the new growing season.
The intensity of the spring flower bonanza is affected by the weather patterns of the preceding summer, fall and winter. A dry summer and a wet fall ensure that the flowers don't go to seed too early and that they germinate at the proper time. A cold winter prevents other plants from sprouting early and crowding the flowering plants. A moderately wet spring provides the necessary moisture for lavish blooms.>align="left">Texas is a very large state, so knowing where to go to find subjects requires some planning. Arguably, the best part of the state is in the central section, around the state capital of Austin. Austin itself has large displays of wildflowers along most of the roadsides. Route 360, the Capital of Texas Highway, Interstate 35 and Route 290 are good places to start. Texans in this area are serious about wildflowers. The National Wildflower Research Center is located southwest of Austin and has a 42 acre parcel seeded with many types including Indian paintbrush, bluebonnet and evening primrose. This Center is a great place to visit early in your trip to help learn what you can see and to find out where it's blooming. Their address is 4801 La Crosse Ave. Take loop 1 (Mopac) south past Slaughter Lane. Turn and go east on La Crosse Avenue for a short distance to the Center. The phone number is (512) 292-4627. The Center also maintains a wildflower hotline at (512) 832-4059. The center was inspired by Lady Bird Johnson as part of her efforts to beautify America and the Texas area in particular.
If you have the time and the inclination to out to the countryside, you can find great flower opportunities in any direction you go from Austin. Let's start with the regions to the east and southeast of town.
Washington County, Yoakum County, DeWitt County and the Brazos River region are east of town. In Washington County, any of the side roads north of Route 290, near the towns of Brenham and Hemstead are good locations. The Brazos area is typically best early in the season (late March and early April). Yoakum and DeWitt Counties are typically best throughout the month of April. Bluebonnets bloom early followed by the yellow flowering plants. This area produces Indian blankets, primroses and hollyhocks amid the old oak trees and historic church cemeteries. The Guadalupe River Valley, in particular, has great examples of this type of subject, as is the Brazos River Valley between Chappell Hill and Washington.
The La Grange area is southeast. It has wildflowers blooming normally from late March into late April. Old farm buildings, grazing cattle, rural churches and old bridges set off the blossoms here. Travel the local roads off of Highways 71 and 90 around La Grange and Columbus.
To the north and northwest of Austin you can see great displays of flowers around the Highland Lakes area. The roads around the towns of Burnet, Marble Falls and Kingsland as well as the north shore of Lake L.B. Johnson offer photographic opportunities. Also travel route 71 northwest of Austin from Llano to Johnson City. LBJ State Park near Stonewall is consistently good. Mason County to the northwest of Austin can be a good bet. Mason County has many stone houses and stone fences to add drama to your images. The roads around the town of Mason and Fredonia are worth exploring.
The Rio Grande region of southern Texas in and around Big Bend National Park is a good stop. This arid region is very dependent on rainfall for good flower production. Spring and late summer rains will generate carpets of flowers among the flowering cactus. Prime spring blooming time is March to May. The Chisos Mountains sport blooming wildflowers later in spring. The Dagger Flats area may have dramatic giant dagger flowers in April.
East Texas, with its abundant rainfall boasts year around blooming flowers. The areas near the Texas-Oklahoma border from Wichita Falls to Paris are dotted with forest and swampland. These areas have dogwood and wild azaleas in the spring with bluebonnets, wild passionflowers and primrose later in the season. Far eastern Texas, around Beaumont has great flower potential as well. The Big Thicket National Preserve is wonderful most of the year. At Big Thicket you may find dogwood, wild azalea and sundew in spring, Indian blanket and magnolia in summer and cardinal flower and ironweed in fall.
Don't overlook the Dallas area in your travels to Texas. The Dallas-Ft Worth region has spectacular blooms from late March through late May. While all of the metro roads have potential, drive out to northeast Tarrant County, around the town of North Richland Hills. Red and yellow Indian paintbrush, pink buttercups, bluebonnets and verbena mix with small yellow daisies along the roadsides.
As you travel through Texas on a quest for the perfect wildflower photograph, pay careful attention to your safety. Pull off the roads completely and watch for traffic, particularly in the more heavily traveled areas. Texas law, at this time, does not prohibit picking of wildflowers but to do so may detract from the experience of others. The law does however come down hard on trespassing and damage to property, so be considerate as well as careful.
In west central Wyoming lies the former logging town of Dubois. This small community is in the home range of the largest herd of bighorn sheep in the lower 48 states and is the site of the National Bighorn Sheep Center.
The Center's mission is one of public education about the habitat and the conservation needs of the Rocky Mountain bighorn sheep. This educational experience is enhanced by the proximity of the Whiskey Basin Wildlife Habitat Area, located less than five miles east of the Center.
The best way to enjoy this area is to first visit the interpretive center in Dubois and then to tour the big horn habitat in the Whiskey Basin area. Dubois is located about 50 miles southeast of Grand Teton National Park, by way of the dramatic Togwotee Pass. The Bighorn Center is about one half-mile northwest of town on U.S. highway 26/287.
The Center's facility houses exhibits and displays dealing with various aspects of sheep ecology including habitat, biology and behavior. The center is more than a static display dedicated to sheep; it is an active part of the community. The gift shop displays the work of many local artists and the staff provides a source of cultural as well as scientific information to local people as well as visitors.
Summer hours run from Memorial Day through Labor Day (9:00 A.M. to 8 P.M.) and winter hours, like the Wyoming weather, are variable. Winter activities center on wildlife viewing tours in the Whiskey Basin Area. Information on hours and tours is available by calling or writing the Center. The address is PO Box 1435, Dubois, WY 82513 and the phone number is (888) 209-2795 or (307) 455-3429.
After visiting the Sheep Center proceed to the sheep viewing area. The sheep population in Whiskey Basin normally numbers about 900 although recent outbreaks of lungworm and pneumonia have reduced the herd somewhat. This area is a good winter habitat because the famous (infamous?) Wyoming wind keeps the slopes free of snow and exposes the bluebunch wheatgrass and Idaho fescue that make up the normal diet of the sheep. Sagebrush and other shrubs are also present and provide an additional food source when the grasses are covered by snow.
To reach the viewing area drive east from the center on Highway 26/287 for 4.5 miles. At the sign for Jaley' Fish Hatchery and Whiskey Basin Wildlife Habitat Area turn on to the side road and start climbing toward the mountains. As you go along you will see a panoramic view of the ridges and meadows that are the winter home to the bighorn herd. The best time to visit this area is during the breeding seasons from late November through the end of December. The large rams challenge one another for breeding rights and can be observed and photographed relatively easily.
There are several stops along the tour road that are worth the time. About two miles up the Trail Lake Road is a kiosk with a detailed map and information on the area. Please read and take to heart the section on ethical viewing. These animals need all of their energy to survive the harsh winters and any additional stress from humans can be very detrimental. One additional word of caution, the road does go through some sections of private land, please respect those areas and continue through without stopping.
As you continue up the road there are several places you may want to stop. There are no signs so watch your odometer for mileage. At mile 1.0 there is a cattle guard. From this spot you can see a treeless slope on the right. Bighorns as well as elk and mule deer frequent this meadow but bighorns can be seen at any place in this region. You can see several lakes from this vantagepoint. On the left are two small lakes that attract waterfowl during migration seasons, if you are fortunate you may see trumpeter swans. The string of three larger lakes, further up the valley, includes Torrey, Ring and Trail Lakes. As you pass these lakes, watch for osprey. There is an osprey nest near the head of Torrey Lake. The nest is on private land so don't stop.
At mile 3.9, between Ring and Trail Lakes, you will see a bank on the right side of the road. This is a natural mineral lick for bighorns, especially in the winter. If you do see sheep here, photograph them from a distance and wait until they leave before moving through. About ¾ of a mile up the road (mile 4.6) Torrey Creek comes very near the road. The willows in this area are a food and shelter source for moose. Beavers are a fairly common sight here as well, particularly around dawn and dusk.
At mile 6.6 is the trailhead into the Fitzpatrick Wilderness. This trail affords an opportunity to see dramatic waterfalls, soaring golden eagles, rugged granite formations and a few miles up, a spectacular alpine lake.
When you plan your trip to this part of Wyoming, remember to dress for the weather. The temperature can change quickly and precipitation in the form of either snow or rain can move in without warning. Dress in layers and bring water repellent gear for you and your camera. Also bring food, water and basic survival equipment.
More information and maps are available from the Bighorn Sheep Center. Food, gas and lodging are available in Dubois.
As the dog days of summer approach, can the beauty of fall be far behind? It's never to early to start preparation for your fall color shooting. The great color of foliage in the fall makes it difficult to take a bad photo, but with some forethought and planning you can spend the winter enjoying some spectacular images.
What exactly causes the leaf color to change from the deep green of summer to the autumn hues? The yellows and orange tints come from carotenoid pigments that are always present in leaves. The reds and purples are caused by anthocyanins that develop on sunny days during the growing season. These colors are present long before the fall color season but are masked by green chlorophyll. In the fall the green fades as the trees and shrubs prepare for their winter dormant phase. As the chlorophyll drains from the leaf, the color pigments become visible. The intensity of color depends very much on local weather conditions. Normal rainfall during spring and summer normally produces the best color. Warm, sunny days and cool nights, as fall approaches, also yields better color. The peak color normally lasts about one week and this peak slowly moves south.
When you plan your fall outings, there are many destinations you can choose. The classic place for fall color is the northeastern U.S. Consider a trip to New England in late September or early October. Great photo opportunities abound from Vermont's White Mountains (especially the mid third of the state around Burlington and St. Johnsburg) to the Connecticut River Valley (between Hartford and Old Saybrook, Connecticut). The other New England states offer great color as well. When in the northeast, make sure that you spend a good portion of your time traveling the backroads and country lanes. Not only are the color shots great, but you can include quaint farm buildings, covered bridges, and villages in your photos. Peak color in New England usually occurs in the first ten days of October plus or minus a week.
The eastern half of the country has many other fall color opportunities. In the Great Lakes region there are many fine destinations. If you find yourself in Michigan in the later part of September, consider traveling to the area around the Pere Marquette and Mackinaw State Forests in the northern part of the Lower Peninsula. A trip farther north into Ontario, Canada can provide excellent fall color with water features as a bonus. The peak time here is the same as the northeast.
Other eastern locations offering excellent color are The Great Smoky Mountains NP in Tennessee, Acadia NP in Maine, West Virginia's Canaan Valley and the Adirondack Mountains in New York.
The west provides a much different type of fall color photo opportunity. While the east has large expanses of many color variations, the west offers almost exclusively golden aspen and cottonwood with an occasional red highlight. These trees are mixed with dark green conifers and the majestic background of the Rocky, Sierra and Cascade Mountains. The color in the west moves with elevation, not just latitude as in the east.
Some of the best color in the Rockies is in southern Colorado's San Juan Mountains. The areas around Silverton, Ouray, and Telluride have been the fall destination of many photographers over the years. Further north in Wyoming, the Yellowstone and Grand Teton areas are alive with fall color in late September. Other western opportunities include the Cascade Mountains of Washington, the Columbia River Gorge of Oregon and Yosemite NP in central California.
There is a third area of color opportunity you may want to consider. The tundra and taiga forests of Alaska and northern Canada change color much earlier than the lower 48 and southern Canada. These lower lying plants and shrubs change to magnificent colors that can be great for tight shots and medium format work. Travel destinations of White Mountains NRA, Arctic NP and the Chatanika River are popular with fall photographers.
When planning your photography there are some geographic considerations you many want to think about. The east has large expanses of color but many overcast or hazy days. These atmospheric conditions provide better opportunities for close up, pattern or tight compositions. The west typically has more sunny days and higher contrast situations. These conditions often allow for "big" scenic photographs. These are just ideas and local conditions really determine best subject matter. The equipment needed for fall photography is fairly simple compared to some other types of outdoor and wildlife work. Your 35mm SLR with a 28mm wide-angle, a 50mm macro and a short to medium zoom telephoto should cover just about any situation. A tripod is a must because of the chances for low light and small aperture shots. Three other requirements are an 81A, an 81B and a polarizing filter. The 81 series filters can be used to add extra warmth to your photos when the available light is cold and flat. On sunny days the shadows are rich in blue light, so use the 81 series filters to add warmth to the reds in your subject. Polarizers are helpful for increasing the saturation of leaf colors and for darkening blue skies. Polarizers limit reflection from leaf surfaces. Believe it or not, leaves in the fall can be very shiny and the need to limit reflections is very real. Polarizers are more effective for sidelit subjects. Don't use 81 series and polarizers together as the added light/glass interfaces may degrade your images. Subjects for fall pictures are as varied as any photo endeavor. This is a double-edged sword. When venturing into the field in the fall, you must be careful in composing your shots so you don't have boxes of pretty pictures with no real "zip". As with any set of composition rules, the following ideas are for the "guidance of the wise."
One of the composition rules should never be violated; make sure that you have a central theme and a simple composition. In fall color work it is very tempting to include everything you see in one shot. The result is normally a very busy but dull photo. When looking for subjects, watch both the big picture and the small scene. Look at the forest floor as you walk. Think about such things as reflections, motion (long shutter speeds on windy days), small groups of leaves (odd numbers are better), close up of leaf details, wet leaves, straight up or down shots, back lit subjects and panoramas. If you find a road winding into the forest, try for an S curve originating at the lower left of the frame. Try shooting just after a storm clears or perhaps during the storm to catch snowflakes as streaks on your film (shutter speeds of 1/15 to 1/30 of a second give the most pleasing streaks).
As you plan your composition, keep in mind that the color catches your interest but the composition holds it! The artistic part of composition is really what moves you. The composition and exposure need to convey the feeling you have when you trip the shutter. Elements such as lines, shapes and forms should be strong. Take care with the separation or merging of objects. Watch the edges of the frame to ensure branches and tree trunks are not crowded or cut off. The use of selective focus can be strong or can create distracting out of focus foregrounds or backgrounds.
The logistics of a fall color photo trip can be as varied as the subject matter. Most states where fall color is worth the trip have a hot line phone number, a web page or both. Contact the tourist department of the states that interest you for details and numbers. As you prepare to head out, pack your camera equipment and include clothing for any weather. Fall has as much variability in weather as it does in foliage.
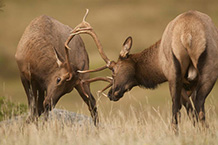
Vicious monster, endangered animal, fascinating creature; each of these terms has been used when the topic of grizzly bears arises. There are bodies of evidence that can be cited to defend each one. To truly understand the great bears would require a lifetime of study, but you can be sure that any knowledge will help you in your quest to photograph these animals.
Grizzlies are one of three subspecies of brown bears found in the Northern Hemisphere. The other two are the Eurasian brown bear and the Alaskan brown bear, also somewhat mistakenly called the Kodiak bear. To the photographer working in North America, the grizzly and the Alaskan brown bear are of most interest and we will cover both under the umbrella of "grizzly".
Grizzlies historically ranged over all of the western and central parts of North America, from Alaska to northern Mexico and as far east as the Dakotas and Missouri River drainage. In modern times the pressure of human population expansion has reduced their range to Alaska, Western Canada, and a few pockets in the lower forty-eight states.
The physical description of a grizzly is characterized by form and shape. The bear has a large, stout body with a small head sporting nondescript ears. The legs are fairly equal in length front to back and tapered from the body down to the paws. The most distinguishing features of the grizzly include a long thick coat that can range from cream or cinnamon to black and can have hairs with white tips (hence the grizzled look which gives the bear its common name). Other distinguishing features are the pronounced shoulder hump (comprised of muscle mass), long front claws, and a narrow head with a long snout and jaw.
Grizzly bears vary widely in size with individual males being reported to weigh between 400 to well over 1000 pounds. Females are typically smaller but are still considered very large when compared to humans. The size of the bears is related to diet and the availability of food on a regular basis in particular. The largest of the bears are typically on the west coast where annual fish runs, along with ample plant food, provide a nutritious and reliable diet. The bears in the interior, where less food is typically available, are somewhat smaller.
Behavior
The behavior of grizzlies, as with all bears, is typical of any strong intelligent animal; that is, very unpredictable and based on the situation, the bear's previous experience, and on the personality of the individual bear. Bear behavior is basically driven by the need to insure reproductive success. This can take the form of sows defending their cubs, any bear defending its food supply, males challenging each other for territory, etc.
The cycle of a bear's life centers on winter denning, a time when the life of the bear begins or is renewed. The spring, summer and fall are spent eating large quantities of food to add a fat layer sufficient to see the animal through the winter. Diet changes as the seasons progress. Spring is a difficult time as the new plants are just getting started and the bears, recently emerged from their winter den need to start to replenish fat. The spring meals consist of new plant growth and if available, carrion from winter kill mammals such as elk and deer. Summer provides improved food availability as plant growth has continued with tubers and grasses becoming plentiful. In addition, in late summer fish runs begin and provide a rich source of fat and protein. Fall sees the continuation of fish runs and the explosion of berries for the final effort to prepare for winter. These animals will also eat insects and rodents anytime the opportunity presents itself. The first snow and cold of approaching winter triggers the denning instinct. When this time occurs, the grizzly seeks out a remote site and digs a den in a location suitable for a long winter nap. Bears do not hibernate in the classic sense as they won't experience significant body temperature drop and reduction of bodily functions. They do however achieve a reduced state of activity and show an increased efficiency in metabolism of fat. Observers have seen bears awaken in mid winter, emerge from their den and walk about only to re-enter and resume sleeping.
Mating and cub rearing
Grizzly bear females mate and produce their first liter between one and one-half and four and one-half years of age. The actual achievement of sexual maturity is dependent on food supply. The bears mate in the May/June time frame after a brief courtship, which can last between 2 and 15 days. Females may mate with multiple males. This "promiscuous" strategy has probably evolved because the other option would involve males defending their right to breed with the females, leading to violent confrontations between extremely powerful animals. This could easily reduce the reproductive success. Although these battles sometimes occur, they are more the exception than the rule. The female will carry the fertilized eggs until she dens in the October or November timeframe. Implantation will occur if the health of the female is sufficient for her to have a good chance of successfully denning and delivering her cubs. The cubs are born during the winter anywhere from February through March. They are less than a pound in weight at birth and nearly helpless. Liters are normally two or three cubs, again depending on the diet of the mom. The female will nurse the cubs as she sleeps until they emerge as a family in the spring. The cubs will stay with their mother for two to four years during which time she will defend them from danger, including male bears, and will teach them the skills needed to survive on their own.
Territory and Dominance
Each bear has a territory in which it lives its daily life. Territoriality too is related to reproduction. A male will normally have a large territory that can include tens to hundreds of square miles. This territory is marked regularly to reduce the chances of males encountering other males since solitary animals are jealous of their "space" and defend it vigorously. The territory of the female is significantly smaller than the male; therefore, a male's territory will include that of several females. The female will share her territory with her female offspring. Their extraordinary sense of smell is the primary method by which they identify territory. The animals will scratch tress and scrap the ground to leave a scent unmistakable to other bears.
Territorial behavior is typical, but in the situation were food supplies are highly concentrated, such as fish runs, a more tolerant attitude can prevail. Situations where groups of bears are fishing show only a temporary reduction in the size of a territory but adult bears continue to demand space.
Dominance in the life of a bear can take on many manifestations. Females will aggressively defend cubs against all threats, even large males. Males will establish a hierarchy through size, threat displays, or occasional combat. When bears do congregate, the hierarchy is maintained and is regularly demonstrated (such places as at the best fishing spots).
Male bears extend their dominance and reproductive drive to the point that they have been known to kill cubs.
Places to see and photograph Grizzlies
Photographing grizzly bears in the wild can be a dangerous excursion, so the utmost in planning and care is necessary. Most zoos and some wild game parks have grizzlies and occasionally photos with a decent background can be made. If you want to photograph them in the wild areas of the lower forty eight states there are populations in the Yellowstone ecosystem and in Glacier National Park. Check with the rangers as to potential locations and always follow the park regulations to the letter. It is advisable to try this activity in a group rather than alone. Before starting out on a bear photography trip read the book Bear Attacks by Stephen Herrero. This book may sound a bit gruesome, and in fact some of the accounts are a bit unnerving, but it provides a valuable insight into bear behavior and how to deal with bears.
In the natural world everything is in constant motion. Nowhere is this as visible as the migration of wildlife from one place to another. The avian members of the animal kingdom don’t have a lock on migration but they do have the most visible for people all over the planet.
Birds migrate for one basic reason, to survive as a species. The driving factors are normally food supply and nesting territory. Migration normally takes place between the nesting and the non breeding season. The terms used here (nesting and non breeding) are specially chosen to allow for seasonal and geographic variations.
There are many different types of migration, depending on the time, direction, distance covered and magnitude of the behavior.
Complete migration is the type we think of generally when discussing migration. This term is applied when all members of a population leave a nesting area during the non breeding season. There is typically no overlap of nesting and non breeding territory. Consider the example of the rough-legged hawk that nest in the far north and winters in the lower forty eight states.
Partial migration is applicable when some individuals remain in the nesting area during the non breeding season while others leave for another area. Red tail hawks are representative of this behavior as some migrate while others remain in the nesting area. The result is an overlap of typical nesting territory with typical non breeding season territory.
Differential migration refers to differences in distance or seasonal movement of portions of a species. This is normally divided by age or sex. The herring gull nests in the Great Lakes area and migrates to one degree or another to the eastern seaboard. The first year birds tend to move the farthest, sometimes deep into the south. The second and third year birds don’t go quite as far south while the adults (four years and older) remain much further north, even in the nesting territory. American kestrels demonstrate differential migration in that the males tend to remain closer to the nesting territory while the females migrate greater distances. The reasons for this behavior vary. The herring gull migration pattern is most likely due to social dominance where the younger, less aggressive birds move away from the more aggressive, older birds. In the case of the kestrel, the males remain close to the nesting territory to enhance their chances of reclaiming the best sites when nesting season returns.
Another type of migratory behavior is irruptive migration. This movement is irregular and normally driven by food or weather conditions which don’t follow a normal seasonal pattern.
To assign a particular migration type to any population of birds is difficult because some sub species or particular groups may not do what others do. Natural selection has programmed the behavior of these groups so survival and reproductive chances are maximized.
The frame of reference for North America is typically north-south movement. This is generally referred to as latitudinal migration. Blue wing teal nest in the North Dakota pothole country and winter in the marshes of Louisiana, a typical north-south migration. Other species migrate in an east-west pattern, such as the white winged scoters that nest in Alaska and winters in western Ontario. This east-west movement is called longitudinal migration. This pattern is very much food source driven.
There are birds migrating from one elevation to another to achieve the climate and food requirements they need. This behavior can lead to significantly different migration routes, depending on the location. As an example, a subspecies of dark eyed junco, nesting in the mountains of West Virginia, migrates to the lowlands in winter. This is a journey of twenty to thirty miles. A very similar junco, nesting in the forests of northern Maine, may migrate over a thousand miles to achieve the same results.
If we move away from the common migratory behavior common in North America, we see many examples of very different behavior. In the southern hemisphere there are mirror image north-south journeys, called austral migration. Some of these migrants will actually cross the equator and show up in the north as rare bird alert material. One of the major differentiators between the hemispheres, leading to vast population differences, is the polar land mass. In the northern arctic there is substantial nesting habitat in the higher latitudes, yielding a large migratory population. In the south, the equivalent area is open water or the barren land mass of Antarctica.
The southern hemisphere does have it large bird populations, and these groups do have their migratory behavior patterns. The populations are much larger in the tropical and near tropical areas of Australia and Africa.
Seasonal migration in the southern hemisphere tends to follow the wet season, as the moisture tends to generate the food supply (particularly insects, the bottom of the avian food chain).
There is an aspect to migration, besides the general knowledge, interesting to the nature photographer. The fact that migrations can take significant time and energy means that birds need to stop and rest along the way. Combine this with the regularity of travel and the large numbers of migrants, the opportunity for photography can be incredible.
Stopover locations are the best places to get images of birds not living in your area on a year around basis. These stopover locations are essential to successful migration and breeding. Birds use these stopovers to gain and replenish fat used to provide energy during long flights. The rest breaks can be as short as a few hours or can last many weeks. Sand hill cranes from the Bosque del Apache refuge in New Mexico will spend four to six weeks in the San Luis Valley of Colorado on their northward migration to Gray’ Lake NWR in Idaho. This is a classic example of a great opportunity for bird photography.
Waterfowl spring migration is very different from most other birds. Ducks and geese tend to eat their way to their destination. These birds travel as part of very large flocks and will stay at a location as long as the food source is viable. When the nourishment is gone, the birds will move on to the next location.
The knowledge of tactics used by birds during migration, as well as their routes, is very beneficial to the nature photographer. The tactics are varied, ranging from the hawk family’s tendency to ride thermals to a high altitude and then soar, to the ducks rapid wing beat with frequent stops. Song birds tend to fly at night and roost during daylight hours at their stopover locations, while waterfowl and raptors fly during the day. Song birds also tend to migrate after a weather front has pasted so they may take advantage of the wind direction.
The knowledge of your subject is critical to the success of your photo work. Study the migration habits of birds coming through your area or check with local bird experts. There are two chances a year to catch these avian vagabonds, so don’t be caught seeing the north end of the last south bound migrant.
When we think of wildlife photography, we tend to emphasize animals. But, there is also a form of wildlife that has no hooves, fangs, wings, talons or claws: wildflowers. We have a wide variety of wildflowers in Colorado, and many places to find them within a short daytrip from the Denver/Boulder area.
With the severe drought this summer, I’ve not pursued many opportunities to photograph wildflowers, but I did spend many weekends in 2011 looking for, and finding, wildflowers. One of my favorites, Tanglewood, is a relatively easy drive south on Highway 285. Okay, it’s easy for me, since I live right off 285 between Wadsworth & Kipling; it’s not too bad of a trip from most of Denver, anyway.
To get there, go south on 285 (I know: it’s really west for a good many miles going out of Denver, but the signs say South, so that’s what I’m going with) and turn right on Deer Creek Rd/County Road 43. This is shortly before Bailey, so if you get there, you’ve missed it. At about the 6.8 mile mark, the road forks; take the left fork. Three miles later, you’ll see find the Deer Creek campground. Go to the right at the stream crossing. Going left takes you up some private land, with limited space to turn around; I made that mistake once and wouldn’t recommend it. The right-hand route takes you up to the Tanglewood trailhead. Once you’ve gone right, the road narrows significantly and gets extremely rocky. In fact, it gets rocky enough that I had to slow down in my Subaru and creep up the road. It’s not a long way from the trailhead at that point, so it’s not too bad. It narrow enough for traffic in only one direction and has turn-outs that allow one driver to pull aside to let another pass through.
At this point, with my description of the narrow, rocky road, someone might wonder if it’s worth going to Tanglewood to find wildflowers. It is. At the trailhead, I’ve seen a Prius, so I know low ground-clearance vehicles can make it with relative ease. And, the narrowness of the road shouldn’t deter anyone either; I’ve seen, and pulled over for, large Winnebagos that had spent the night in the parking lot at the trailhead.
The guidebook I use lists a large variety of flowers for this trail, including wintercress, wild roses, a couple varieties of penstemon, pink pussytoes, various violets, cinquefoils, and Parry primrose. I’ve personally seen bluebells, claytonias, cowpen daisies, and lupines there. The trail also follows a nice stream that, at points, is open enough to do some nice,
long, soft water shots. Last time I was out there, I also saw an enormous, red mushroom. I took a photo and let the fungus alone. I know better than to sample unfamiliar fungi. The altitude ranges from 11,691 to 11,941 feet. Keep this in mind if hiking with folks sensitive to higher altitudes.
It’s been about a year since I’ve been out to Tanglewood, so I can’t say what this dry year has done to any of the foliage. So, venture forth with the expectation that any flowers are a bonus. If nothing else, it’s a beautiful, secluded place to hike.
At this point, I’ll recommend the guidebook I used to find this trail: Colorado’s Newest & Best Wildflower Hike with text by Pamela Irwin and photography by David Irwin.
Left Brain vs Right Brain
The Other Side of Photography
Left Brain versus Right Brain: Is Photography One or the Other?
By Andy Long
Many people associate a left-brained person as technical and analytical and a right brained person as creative and artistic, which would tend to lead to the thought that photographers are more right brained. I was thinking of this, putting many parts of photography onto the creative side of the ledger.
Most people go through life with a tendency to be one or the other as it helps make us who we are. There may be some instances ehere combining the two helps with certain situations and if someone is totally left or right brained some activities might be a bit more difficult. After doing some reading it seems we need to have chracteristics of both and maybe leaning more to the left-brained side to fully take advantage of this are we call photography. Isn't there some aspect of photography that is one or the other, primarily on the right brain side?
The general rule of thumb is there are two different kinds of shooters, left brained which includes aspects such as extreme precision and following rules for things suchg as composition (rule of thirds, leading lines, etc.) and right brained with shooting from instinct, susbending thought and just taking photos when things look right.
For doing wildlife, at first thought it would seem to lean towards being a right brained activity. While there is a bit of the left brain used when it comes to using the rule of thirds, most of the images taken are based on when things look right at the peak of action or behavior. The more wildlife photography done over time, the more instinct comes into play as to knowing what behavior or action occurs just before something else takes place.
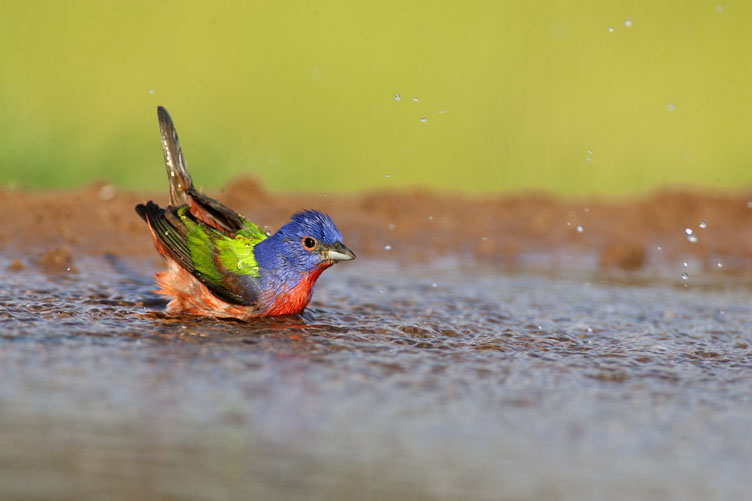
We get a feel for what is right and let go when wildlife is around. We want to get all the shots we can if there is not a lot of time to try and set things up to get the perfect shot. Isn’t it more dependent on what the animal is doing rather than the photographer making sure the lines are good? Who needs to get technical when a bird is taking a bath right in front of you? You see the action and you point and start shooting. How about when a wading bird is in the water hunting for a meal and we just track with it until it strikes and we fire away?
But, with trying to capture the peak of action, the left brain does come into play regarding precise timing in order to get the best shot. On second thought, there are some other rules we try to keep in mind when doing wildlife photography. We try to think about the background so there isn’t a lot of confusion that takes away from the main subject. We also look at the lighting conditions in order to determine what settings are best for a shot as to what shutter speed is needed, what’s the best f/stop, and what kind of exposure compensation is needed. Most experienced wildlife photographers have a magic shutter speed they want to have as the slowest to try and capture fast action, so this is a part of the technical we use but do automatically. For me, that magic shutter speed is 1/1000th of a second.
We also tend to put emphasis on composition rules more than we think we do. If a bird is flying from left to right, we want to make sure it’s placed more on the left side of the frame to give it room to fly and not with its head close to flying out of the shot.
We can go into autopilot when we’ve been doing wildlife photography for quite a while and the technical side is natural, but we can’t disregard the fact that there is a bit of left brain in use for this subject,
Hmm, I guess wildlife photography does need a combination of both left and right brain to be successful and get the best shots.
Waterfalls. Surely, this has to be a right brained subject. We go to an area where there are a lot of waterfalls and we let our creative side some out and get a great composition to show the beauty or the power of the waterfall and just go with the flow. We want to portray some great colors or something nice that’s laid out in front of us and we compose to bring out its beauty. While looking around for just the perfect angle isn’t this all about creativity?
Maybe not. The first thing to think about is whether a fast or slow shutter speed is going to be used to either smooth out the water or freeze the movement to show the power of the running water or the spray being thrown out from where it comes to an end.
Composition is pretty much ruled by the left side of the brain here. The rule of thirds is very important in capturing a quality image with the placement of the falls / cascades in relation to its surroundings. Line can also be used to lead the viewer from one area to the next within the frame and this is fully a left brain activity. And if there’s a rainbow emerging from the light and the falls, knowing what settings to use to enhance then colors are completely on the technical side.
How about with wildflower or fall color photography? These are where the artistic side has to be able to come out and shine to get these beautiful artistic images. We see something we like and set up and take the picture to bring out the essence of the scene.
There is a strong creative side to this, but again the technical side plays a key role. Understanding depth of field and how to implement hyperfocal distance is truly technical. Most of the composition is fully left brained for making sure the foreground and background work together, using line to lead the viewer up and around and making sure the right colors work well together.
Where the right side is helpful is in trying to create a sense of mood in a photo. While some technical is used, this is more about emotions and trying to evoke from the viewer a desired feeling when they look at the final image. Composition and exposure play a role, but a much smaller one than with letting emotions being used to take the shot.
In trying to learn about one aspect over the other, it’s much easier to do so of the technical side rather than the creative side. Too often people have a harder time trying to learn artistic if they don’t already have an eye to bring out the best in a scene while the technical side of photography is where the learning can never stop as there is so much out there to incorporate.
A photographer can lean toward one or the other, but without taking advantage of both sides, a lot will be missed, so it looks like the answer is that photographers have to be both left and right brained in order to capture the beauty of our wonderful surroundings.
Take a look at the following images and think about the technical and artistic components of each. The following 6 images are copyrighted by Andy Long.
 |
 |
 |
 |
 |
 |
Most of us have made the shift from film to digital over the past years. When we were shooting film a number of us also experienced the sights and smells of the darkroom and so we had a pretty good idea of how film worked. Light interacted with photosensitive chemicals in the film emulsion and during the developing process other chemicals stabilized the transformed images on a negative or transparency. Digital technology is not all that much different. As I have stated many times before in this column and well as in my classes, the only difference between film and digital image making is the medium on which theimage is captured. Let’s talk digital!
In the digital sensor world, photosensitive has a different meaning that in the film world. Digital sensors are electronic parts (integrated circuits or IC’s) that have a physical structure that allows incoming light to generate electric signals. By the way, IC’s are typically referred to as chips in the industry, so I’ll be mixing terms. These signals are conducted away from the sensor site (the picture element or pixel) by very tiny wires that are part of the IC. The wires take the signal to amplifiers (on the same chip). The amplifiers boost the very tiny signal to a level that can be manipulated and digitized by yet more circuits. The output of the digitizing circuit is a light level, period. This is because the individual sensor sites on a digital sensor are monochromatic; they only see light in terms of intensity not color. So why are all digital cameras only black and white?
The clever design engineers who develop sensor technology also have a pretty good understanding of the human eye and how we perceive color. This is actually a carryover from the color film technology where the designers used color sensitive layers in the emulsion.
The basic sensor is a grid pattern of structures that convert light energy (photons) into electrical energy (electrons) in a way that is not all that different from solar cells. The ability to add color to the image is done by filtering the light before it strikes the sensor. Our old friends red, green and blue (RGB) are at work here. The light is filtered to allow those colors to strike specific sensors and when final signal is digitized into a light intensity level, the tiny little computer chip in the camera can correlate that intensity to a color, and thus adds color to the data file for that sensor site. If you were to magnify the filter structure on a camera, you would find about 25% of the sites detect red, 25% blue and 50% green. This ratio was established to allow the sensor to more closely match the response of the human eye and thus make further “post processing” easier.
After all of the sites have been scanned for light intensity and the camera settings have been added, the data is ready to be stored as a RAW image. As a side thought, a 10 megapixel sensor has about 10 million sites, imagine how fast that little computer is working if you can shoot about 8 images a second.
Obtaining accurate color in digital prints or on screen is a major frustration for many photographers. An image looks great on screen but when it's printed, the color is not the same at all. Or, you've edited your images to perfection and have posted it on your website or sent it to a client and now it's too dark or bright.
Sound familiar? The first place to start is with your monitor. Unless you have an accurately calibrated display you're only guessing that what you see on your screen is what other people will see.
Monitor calibration software - There are a number of options available for calibration of displays. The Mac includes a software calibration system, and Windows users of Photoshop and Photoshop Elements have the Adobe Gamma utility available. The drawback to using either of these tools is the measuring tool - your eyes. Because you're using vision to set properties, there will always be some variation between the optimal settings and what you perceive to be correct. Still, using software calibration is much better than ignoring your display settings completely.
Mac - These come with the Display Calibration Assistant, which is located under System Preferences Displays. Choose Color and select Calibrate to get started. Use Expert Mode to give you as much control over the process as possible.
You'll go through five steps to determine your monitor's settings, each focusing on different aspects of luminance. The next step is to select a Gamma setting. The Mac has historically used a gamma of 1.8. This give you better shadow detail at the expense of saturation in your colors. Choose the PC Standard setting of 2.2. This is in fact the Native gamma for most LCD displays, including the Apple Cinema displays.
Nest is the target white point setting. Use D65, or 6500 K as the color temperature. This will give you the most neutral and accurate whites possible. Complete the process by giving your profile a name and letting the Assistant set it as the default profile.
Windows - Find the Adobe Gamma utility by selecting Start > Setting > Control Panel > Adobe Gamma. This works much like the Mac tool where you set the luminance values by making adjustments to red, greem, and blue boxes on the screen. Be sure "View Single Gamma Only" is not checked and the "Desired" setting is "Windows Default" which is 2.2.
Now, make adjustments to the three color boxes until the solid and striped areas blend as much as possible. Next, set your "Hardward White Point" to 6500 K, and "Adjusted White Point" to Same as Hardware. As with the Macintosh utility,. you'll save this profile and it will automatically be used by your system.
Considerations for screen to printer include:
1) RGB on a monitor is active color, emitted by a source
2) Printers use CMYK (Cyan, Magenta, Yellow plus black) and it's a subtractive process
3) Printers use 4 colors, even if they have 6-8 inks, the basic four colors are all that's really there.
When calibrating a monitor the Gamma adjustment is better than nothing but far from perfect. Your eyes and ambient light changes can have an effect.
LCD should be calibrated every 1-2 months or when some change is made to the environment, hardware, etc.
A side shield on a monitor is good idea. Reduces ambient light glare
Display resolution should be set to the units native for best images, everything else is scaled. You can find native on the literature or the mfg's website. Set the default to this in Windows - 1280x1024 is common
Back in the days of film photography, we worried about grain in our images. It was the wisdom of the time that the faster the film, the more pronounced the grain and the less sharp the image. Exposure times, film processing parameters and such had some impact but that was really a second order effect. The guys in the green and in the yellow boxes were constantly working to improve grain structures to reduce the impact of faster speeds on image quality. That was then, this is now.
The digital revolution has introduced the photographer to the wondrous technologies of electronics and digital signal processing. But, one of the things we now must deal with in our photography is noise, or as some authors call it, digital grain. Let’ discuss its sources and how to deal with it.
What is noise? It’s all of the additional extraneous signals that come from the sensor, the analog electronics and the digital circuits in the camera that show up in our images (and usually have a negative impact on the image). This is particularity visible in images of large single color such as the sky.
Noise has a number of sources. These range from dust on the sensor to the intrinsic errors in converting an analog signal to a digital data stream.
Dust on the sensor is the easiest to understand but can be quite difficult to control. Point and shoot cameras have a pretty good sealed environment around the sensor so dust is normally not a problem, but if you do get dust problems, correcting the root cause can be tough. Digital SLR’s are much more prone to sensor dust but most have a “clean setting” that allows the photographer to blow away dust (carefully!). The other sources of noise are a bit more technical, but let’s start with light striking the sensor. Light comes in little packets call photons. When these little guys strike the sensor they are converted to electrons which are then used to generate the electrical signals containing image data. Since the sensor is warm (that is at a temperature above absolute zero) other “thermal” electrons are generated just by the heat. These electrons create a baseline signal (noise) that contaminates the image information. The signal coming off of the sensor is very small and cannot be effectively used by the circuits that convert the analog data to digital information. To remedy this, analog amplifiers are used to boost the signal. The background noise is amplified as well as the image data plus the amplifier adds its own noise contribution. The amount of amplification is controlled to a large degree by the ISO setting on the camera. The higher the ISO, the more the noise contribution. Higher ISO means the camera will use less light to generate the image. Less light means less signal from the sensor (fewer photons converted to electrons), more amplification is needed and the ratio of signal (image data) to noise is less. This shows up as higher noise or grain in the image.
Another noise source, one that’s easier to relate to film grain is the inherent nature of digital imaging. The process of producing a digital image means we are taking an infinitely variable light spectrum and converting it to discrete pieces of information. The first place is the sensor itself, made up of a fixed number of sensors, not unlike the grains in film. The analog data generated has, as we’ve seen, a noise component. This signal is then once again digitized into discrete pieces of data for processing. Each time this analog to digital conversion takes place, information is lost and edge detail is compromised. When the signal is then compressed into a jpeg file, more information is lost.
So, we have a lot of noise sources. How can we deal with them? The component and camera manufacturers have done very good things to reduce the impact of noise on our images. The first is the development of larger and larger sensors. Larger image sensors have more light gathering capability with a constant noise level. A 6 mega pixel sensor that is APS size generates more effective noise that a larger full frame sensor. The second, and probably most important improvement, is the noise reduction software in the camera itself. This “post processing” activity in the camera (with the RAW data) actually removes a lot of the noise from the signal, producing a cleaner and more grain free image.
What can the photographer do to reduce noise? Well, first use a camera with the biggest sensor you can afford. Unfortunately for the wallet, this usually means a digital SLR. If that’s not in the budget, then shop for the camera with the biggest sensor you can get and do research on the quality of the camera manufacturer’s noise reduction software.
With any camera, the following tips will also help.
1) Shoot at the lowest ISO setting you can for the conditions. Remember, this means less amplification and more light converted to image data.
2) Try to avoid very long exposures. The longer the shutter is open, the more total sensor noise is generated.
3) Use the lowest compression setting you can (high resolution jpeg has less inherent noise than low resolution – but it takes more storage space).
When you do get your images on to the computer, there are several really good noise reduction software packages available. Do some research and see what you can find. More are coming out every day.
Dealing with digital grain is really not that much different from film grain. Learn the causes and the remedies and keep on shooting.
Digital photography has added a lot of new “buzz words” to our vocabulary. One of the most misused or perhaps least understood is “color management”. Discussions of color management lead to more terms like color space, rendering, sRGB, and so forth. We figured a brief foray into the realities of digital color is warranted, so we can utilize the new tools we have.
What does color management mean? Essentially it’s the catch-all term that describes the process of making sure the colors of your subject are displayed the way you want them on the medium of your choosing, and that you can achieve that result consistently! First let’s define a few terms:
Color space is the portion of the color spectrum that is available to the output device (monitor, printer, etc.) for display of the image. In other words, how many colors can you hope to reproduce.
Rendering is the software process of converting a RAW image into a usable file in a specific color space. This word comes from rendition. Another techie convolution of the language.
Color space -. The first step in color management is determining the color space in which you want to work. Remember that RAW files are “rendered” to the color space by the camera’s internal software or the post processing software in your computer. If you shoot only RAW, the rendering must be done in the post processing on your computer. If you can select multiple output files such a RAW plus jpeg, you can specify the color space for the jpeg files.
You should select your color space based on the planned use of the image. Most digital cameras will allow you to select Adobe RGB or sRGB. Adobe RGB has a slightly larger gamut of colors and is less saturated than sRGB. Adobe is more closely correlated with ink jet printers. If you are more interested in viewing your images on a monitor or projecting them with an LCD projector, the slightly smaller color gamut and more saturated sRGB color space is better. Post processing programs also allow CMYK color space which is more suited to publication formats. It’s possible to create different files from the same RAW image in various color spaces using the computer’s RAW conversion program (Photoshop™ as an example).
Calibration of your computer’s monitor - What is calibration and why calibrate? This reason is very simple; it allows you to get prints out of your printer that look just like to image you saw on your monitor screen. OK, what if you don’t print your images but send them out to others for printing, use in magazines, contests, and so forth? Calibration has been compared to such mundane things as getting your car aligned or flossing your teeth, not required but very good practice. When you send a digital file out for any purpose, you really don’t know if the next person down the line will do proper color management. If you know you sent out the best file possible, then the next user will start with a superior product and you’ll have a much greater probability that your image will stand out.
There has been a lot of talk about LCD monitors not being very good for calibration since they drift quite a bit over time and temperature; this was true a few years back newer models are much better and can be calibrated as good as the old CRT models.
The first step in calibration is looking at the monitor. There are whole books written on this subject. In order to calibrate your monitor, you might consider the purchase a calibration product that includes software and a sensor. Many of these packages are available priced from under $100 to several hundred. A little bit of research on the internet will allow you to pick the right one for you. There are also more manual tools, some free, that allow a degree of calibration using the computer’s internal tools and specific light sources.
A really good website with lots of links to information, manufacturer’s sites and a good starting point for monitor calibration is: http://www.normankoren.com/makingfineprints1A.html
Take a look at this site and get started doing better color management of your images!
We have all heard the comment, “well I just fix it in Photoshop™”. I’m not too sure about you but I would rather spend my time in the field shooting than in front of the computer fixing images. One of the best pieces of advice I ever heard, whether shooting film of digital is “get the exposure correct when you take the picture”. If you do this, you will not need to “fix” it later. Over the next few months, the digital corner will go back to exposure and metering basics. This month we’ll look at the metering modes available in today’s digital SLR camera bodies.
Most digital SLR’s have followed their film predecessors in having a variety of metering modes. The 3 basic ones are matrix or pattern, center weighted and spot. In the case of my Canon 40D, the engineers have added a 4th they call “partial”. This forth one is really a variation on the spot meter capability.
The “meter” in the camera is really a combination of the light sensors and the computer’s microprocessor. The processor takes input from the sensors and computes the exposure based on the sensor light readings, the aperture setting, shutter speed, focal length, and a lot of data stored in “look up tables”. Let’s look at each of selectable metering modes of the sensor and consider how to use them most effectively.
Matrix or pattern looks at the entire image divided into a number of segments. In the case of the Canon 40D, there are 35 segments or zones evaluated. Here is an example of the zones in a simpler, 13 segment matrix pattern:
As you can see, the zones are not uniform, but are designed to give the camera’s processor information according to a “best case” for normal compositions. Normal is defined as average distribution of light, medium and dark tones. Matrix is usually good for front lit scenes, or scenes with minimal contrast or a moderate mix of light and dark tones.
Center weighted and partial modes look at the entire scene but give substantially more “weight” to the center. Typically 70% of the information from the center area and 30% from the periphery are used to calculate exposure. Here is an example of the center weighting approach.
Center weighted exposure is probably one of the better tools we have. This mode uses a lot of the experience developed over the years of film shooting. Center weighting, along with the exposure lock feature on the camera, provides a very good tool for getting the best exposure possible. This mode is best for scenes with highly directional light, a scene with very bright sections and very dark sections, like a landscape with bright sky and dark foreground, and high contrast scenes. To most effectively use center weighting, while controlling over exposure, always include the brightest area in the center (biasing toward the highlights). Take the reading in manual or any of the creative exposure modes (shutter or aperture priority) and lock the exposure with the AE lock. Then recompose and shoot! A word of caution, this mode, like any other, averages to middle grey so you may need to compensate for very white or very black subject matter.
Spot and partial metering looks at a small part in the center of the frame. All exposure information is calculated from that area. This metering mode is very good for subjects that are in shadow, where you need to control or saturate highlights, and high contrast scenes.
Spot metering also averages to middle grey so you may need to compensate or look to use white balance to get a correct color rendition.
Next time you’re out shooting, try these different metering modes, consider the lighting of the scene and take a few notes on which mode you selected for each shot. Consider adding some comments on why you chose that mode, and see how your images come out. Do this a few times and maybe you’ll spend less time in front of the computer and more behind the lens!
This month we'd like to address two of the things a lot of photographers fairly new to digital photography find perplexing. First, why do digital cameras give an apparent magnification and what are the tradeoffs? The apparent magnification of a digital camera starts with the relative size difference between 35 mm film and the electronic sensor used for digital image capture: "35 mm" film has an effective image size of 24 mm high and 36 mm wide for a "horizontal" image. When we photograph something through a lens, we record a certain size image of the subject on the film.
Digital cameras have sensors that vary in size, and except for a few very high end cameras, the sensor is smaller than the 35 mm image size. In the case of the Canon EOS 20D, the sensor is 15 mm high and 22.5 mm wide. If you do a quick calculation you'll see that the dimensions of the 35 mm image are 1.6 times bigger then the digital sensor.
If we assume the same conditions when we photograph the same subject, that is camera to subject distance and focal length of the lens, the image on the digital sensor will be the same size as the image on the film plane. That's just standard photographic optics. But remember the size of the sensor is smaller than the 35 mm film frame.
Now the real impact of digital! The software in the camera enlarges the image to give an equivalent 35 mm image size.
In doing so, this software magnifies the image on the sensor by the same amount that is needed to make the image sensor look like the 35 mm image, in our example of the Canon EOS 20D, this is 1.6x.
OK, we now have a l.6x magnification, what did it cost? If we had used a 1.6 teleconverter we'd have lost some of the image because the angle of view would have been decreased as the effective focal length of the lens increased, the same happens with the digital, but in this case, the information that the lens gathered was focused beyond the edges of the sensor so it was lost; the same effect as reduced angle of view. The second thing we lose with a teleconverter is light, namely the effective f stop of the lens is increased by about 1 stop. (f4 to f5.6 for example) In the case of a digital camera, this is not the case. The camera will still show the f stop as the same. BUT, the resolution of the sensor (number of pixels per unit of area) is fixed so a slight increase in what is equivalent to grain will be seen. Digital camera noise reduction software does a very good job of smoothing out this grain effect, so the apparent magnification gained is pretty close to free.
Now let's think about a few other things that may have slipped by in our discussion. First is the aspect ratio. That's a fancy mathematical term for the relative size of the horizontal and vertical dimensions. 24 x 36 or 15 x 22.5 have the same ratio, 2 to 3. This has a real impact in printed image size and can readily explain the popularity of printing image in 8 x 12 size instead of the venerable 8 by 10. 8 by 12 does not require cropping of one dimension. When digital scanning and printing became popular, the long held 8 by 10 dimension was challenged and quickly abandoned.
The second thing to think about is some of the new lenses being marketed. If you look at the magazine adds for some new products, such as Canon EF-S lenses, you'll see a note indicating these lenses are only for digital cameras like the 20D. This is because they focus the image not to a full 24 by 36 mm area but to the size of the image sensor. Remember we said earlier that the equivalent of reduced angle of view was due to the information falling off of the edge of the sensor? This doesn't happen with these new lenses. The effect if these lenses were used with a film camera body, assuming the computer in the camera would allow the photo to be taken, would be a smaller image on the film plane.
As we all look to migrating to the world of digital photography, we need to be prepared to learn new terms and new ways of applying the tools of this medium to image capture. Digital has brought with it a whole new set of terms that can be daunting. The other day I was in a discussion on one of these, white balance, and it became clear that this is a scary topic for a lot of people. I wanted to take this opportunity to address white balance for those of you who have questions about what it is and to address how to use it creatively.
To understand white balance, we need to look at an old friend and some basic human vision processes. First let's consider color temperature. This concept has always been part of film photography as we have used special films, flash units etc. Color temperature refers to the color of light. The concept is one we have borrowed from the world of physics and of course we have applied our own photo-related spin to it. Color temperature is the value assigned to the color of light that radiates from a theoretical object physicists call a black body. As the temperature is raised, this body starts to glow, first a dull red, then brighter red and finally a blue-white. Since it's a theoretical object, melting is not a concern. Color temperature is measured in degrees Kelvin. This is a temperature scale that is the same as the Celsius (or Centigrade) scale except it is offset so that 0 degrees Kelvin is the same as about -273 degrees C. (This value is referred to as absolute zero, the coldest temperature that can exist in nature.) In nature we have low color temperature (red) moving up to high color temperature (blue). As photographers, we look at this in the opposite way, red being warm and blue being cool but so what!
Now let's look at human vision and how a digital sensor tries to emulate it. The human eye has two types of light sensitive organs in the retina. One type is called a rod. The rods are special organs used to provide vision in very low light and do not differentiate color. The other organ is called a cone. The eye has three types of cones. These cones detect can red, blue and green. The optic nerve conveys information from all of these sensors to the brain where the information is processed to give us vision. The designers of the sensors in digital cameras (whether CCD and CMOS) have taken the structure of the human eye and emulated it in the camera. The sensor elements or pixels are arranged so that they detect light and produce a signal that represents the amount of light energy striking the surface. In order to produce color, a series of red, blue and green filters are used in front of the sensor. This very closely emulates the concept in the human eye. This information is passed to the camera's "brain" where a software program assembles it into an image. This is where the analogy starts to break down. In the human brain we use experience to recalibrate the image we see. For example, when we read characters on a sheet of paper, the paper is white regardless of the color temperature of the light illuminating it. Just try reading a book under fluorescent lights, outside in the evening, or with incandescent lights. In each case the page appears white.
The digital camera tries to emulate the brain by setting a white reference or balance. To do this, it must be calibrated to what is truly white. Most cameras have three white balance settings. With auto white balance, the camera assumes that the scene has significant white content or more correctly, has a "normal" ratio of blue and red. The second setting is a preset white balance where the camera allows the photographer to choose a white balance based on evaluating the scene. This is similar to choosing a special film or a compensating filter to adjust for the color temperature of the light source (tungsten film, fluorescent light filters, etc.). The third white balance option is manual and represents the best creative tool. Manual white balance allows the photographer to set the white balance for the actual situation. Using a white card to allow the camera to establish the correct baseline for the conditions can do this. (Hint: Sometimes a white card can be overexposed, so when you use it, draw a black line on the card and verify the exposure by checking the image on the LCD screen. Use a felt pen and draw a line on the card. Take a shot and verify that the image on the LCD screen is properly exposed, showing the line accurately.)
The manual white balance sets the camera for "normal" conditions but it can be used creatively as well. By using a light blue card instead of a white one, you can achieve a warm tone to the image, similar to adding an 81 series filter to the camera. If you wish to cool the image, calibrate the white balance with a light pink card. There are several companies that make cards for this use. They have been around for quite a while supporting the television and film industries. One is www.warmcards.com. Also, since you're not burning film, you can experiment!
There is a tendency to set white balance to auto with the idea that you can compensate with the computer later. By all means fight this impulse! White balance is a very non-linear process, treating red, blue and green differently. When you use your computer, it will change the effective color temperature of the image uniformly across the image and not give you the same color rendition as if you properly calibrated the white balance.
Last month we discussed color space and how to select it based on the desired use of the image. This month we’ll look into calibration of your computer’s monitor.
What is calibration and why calibrate? This reason is very simple; it allows you to get prints out of your printer that look just like to image you saw on your monitor screen. OK, what if you don’t print your images but send them out to others for printing, use in magazines, contests, and so forth? Calibration has been compared to such mundane things as getting your car aligned or flossing your teeth, not required but very good practice. When you send a digital file out for any purpose, you really don’t know if the next person down the line will do proper color management. If you know you sent out the best file possible, then the next user will start with a superior product and you’ll have a much greater probability that your image will stand out.
There has been a lot of talk about LCD monitors not being very good for calibration since they drift quite a bit over time and temperature; this was true a few years back newer models are much better and can be calibrated as good as the old CRT models.
The first step in calibration is looking at the monitor. There are whole books written on this subject. In order to calibrate your monitor, you might consider the purchase a calibration product that includes software and a sensor. Many of these packages are available priced from under $100 to several hundred. A little bit of research on the internet will allow you to pick the right one for you. There are also more manual tools, some free, that allow a degree of calibration using the computer’s internal tools and specific light sources.
A really good website with lots of links to information, manufacturer’s sites and a good starting point for monitor calibration is:
http://www.normankoren.com/makingfineprints1A.html
Take a look at this site and get started doing better color management of your images!
Now that you have that new digital camera and are starting to amass a large quantity of images, where do you plan to store them? When we were all shooting slides, they went into plastic pages and then into three ring binders (unless they stayed in boxes with illegible notes written in on the side (I've got lots of those). Now the world has changed and your images are nothing more than a large number of 1's and 0's on some form of storage medium. There are a large number of possible long-term storage methods, each with pros and cons.
Most cameras use Compact Flash (CF) memory cards to record as you shoot. It's possible just to keep buying those cards, especially if you only store jpeg files. 1-gigabyte (GB) cards are down to the $100 range and getting cheaper. A 1 GB card can store several hundred jpeg images from a 4-6 mega pixel camera. That's still pretty pricey and the there is not a lot of room to write information on the card itself. Beware that CF cards are VOLATILE, meaning they be easily erased.
Let's assume you make the choice to down load your images to your PC (or Macintosh system). You now have many more choices for long term storage (notice I did not use the word permanent!). It's possible to add large hard disks to your system (either internal if you are comfortable taking your system apart) or external. External drives connect by either serial or USB (Universal Serial Bus). Hard drives hold lots of data, hundreds of gigabytes in some cases. These are somewhat expensive but you have the luxury of having your images on line and at your fingertips. On the down side, these things are mechanical and wear out, sometimes without warning and if your drive crashes, you may lose every bit of data on the drive.
There are also on-line storage services that allow you to store data at very low cost, sometimes at no cost. These are great as you can access your images from any computer on the internet, using a password. My only caution here is that no one can predict how long these service providers will be around and how much notice, if any, will be given if they do go out of business.
Most people store images on CD's or DVD's that they burn directly from their PC. These are flexible, very inexpensive and allow for many images to be stored in a very small space. So what's the drawback here? The recording method is called burning for a reason. If you record to a CD R or a DVD R (as opposed to one with an R/W) you are using what's known as an ablative process where a tiny laser actual burns marks in the surface of the disc. These marks aren't permanent; corrosion can start soon after recording and eventually make parts of the data unreadable. The current technology for write-once CD and DVD products will support a usable life of about 10 years for HIGH QUALITY discs. Don't use the very cheap discs, as their lifetime is a gamble; buy the best you can get. If you use R/W or rewritable CD's or DVD's you are using a similar process to record data as is used in hard disks, namely one with that is magnetic. These discs are not the best for long-term storage as they can suffer the same fate as magnetic material and can degrade over time (lose parts of the image).
So, just like every other facet of photography, storage of digital images is a handful of tradeoffs between price and ease of access, longevity, etc. The nice part is that you can easily make multiple, identical copies of your images with no degradation and if you can re-record data, again with no image degradation.
My recommended approach is to use high quality CD's or DVD's and note on each one's case when you recorded the data. Then every few years copy the data on to a new disc. As technology moves forward, new, better and more permanent products will become available.
Several camera and lens manufacturers offer features on cameras or lenses that compensate for camera shake or movement. The methods do vary from one manufacturer to another.
The most common, and probably the most successful method, is the use of sensors within the lens. These are known as Image Stabilization (Canon), Vibration Reduction (Nikon), and Optical Stabilizer (Sigma). Within the lens is a set of sensors that detect small movement and correct for it by moving a small optical element in the opposite direction of the shake or movement.
Other companies (such as Konica Minolta) employ a similar function in the camera body and move a prism that is located between the lens and the image sensor.
Video cameras use a digital method where the image is retrieved from different pixels on the sensor to compensate for vibration or camera movement. That works well in the video arena but has significant image blurring in still work.
The movement compensation feature was originally designed to allow slower shutter speeds while hand holding the camera and still produce sharp images. Typical claims are an apparent increase of two to three stops.
Use of this technology is not without drawbacks. There is an added weight and cost factor for the lens based approach. The in camera version also adds cost to the body but does allow use of many more lenses.
When using the stabilization capability on a tripod, there is a potential problem. If the camera and lens are very stable, the electronic circuits in the lens may become slightly unstable and cause the image to blur a small amount. Some lenses have tripod sensors and correct for this. Others have a recommendation in the manual suggesting that the feature be turned off when the lens is on a tripod. As with all photographic “rules” there is a lot of controversy about this. The stabilization feature can compensate for movement and for vibration induced by tripping the shutter at slow speeds. Even when mounted on a tripod, the ability to reduce apparent shutter vibration can be a valuable tool.
The best approach is to do some research before buying or do some testing if you already own one of these lenses or cameras.
Is the feature worth the money and extra weight? In our opinion, YES. We have a 100-400 IS zoom from Canon and love it. Everyone we have talked with has a similar feeling about that particular lens. We’d be happy to publish accounts (positive and negative) concerning member’s experiences with this or any other stabilized lens.
This month, as promised, we’ll look at white balance and color temperature. Most high end point and shoot and virtually all digital SLR’s have provisions for selecting white balance and color temperature. What this means is pretty simple. The photographer can select the camera’s method of representing color on the recorded image.
White balance is simply the camera’s way of looking at all colors of the spectrum and generating true white. The basic setting is AWB or auto white balance. In this mode the camera looks at the entire scene, assumes the light is about midday and comes to a conclusion as to what white should look like. The most creative white balance control is the custom one. Depending on your camera (check the manual) you can find a white object and use it to set the white balance so the camera can accurately record white in the light that’s available. You can also use other neutral colors to cause a shift in white balance but be careful; you can get some “interesting” and perhaps not too pleasant results.
If you really want to be able to alter a scene however, try the color temperature adjustment on your camera. Light is measured in “color temperature” and there is a relation between this value and warmth or coolness of the light. It’s a little confusing but the lower the color temperature, the warmer the light. This is a collision between science and art. Some examples are:
Candle light 1500, Incandescent light bulbs about 3000, morning and evening light is between 3400 and 4000, midday is 5000 to 5500. Flash is typically between 6000 and 6800 while a heavy overcast generates 6000 to 7500. Check out the final paragraph of this article for more details.
There are two ways to compensate for color temperature. One is the post processing phase (on the computer with an image processing software tool) and the other is in the camera. Anything you can do in the camera is inherently better because you are not disturbing the digital image through recompression and manipulation. It does take some experimenting to use color temperature corrections but consider this tips:
To warm up a scene, adjust the color temperature to a high (cooler) value. This is not as confusing as it first appears. The color temperature adjustment on the camera tells the software what color the light is on the subject. If you tell the camera that the light is very cool (high color temperature) the processor will “warm it up” to come to the midday neutral color. If you’re shooting at midday, try setting the color temp to 6500 if your camera uses degrees or to the “overcast” setting if it uses verbal settings. In both cases the camera will warm up the scene.
Don’t rely on the LCD screen on the camera to give you instant feedback on color. These little screens are great for checking to see if you recorded the image, if the exposure was relatively OK and if your composition was close to what you wanted. They are not good for checking color, focus or details of the image. You don’t see those until you view the image on a calibrated monitor or properly produced print.
Using color temperature creatively requires the old fashioned concept of taking notes and then reviewing the final images. From this you can start to learn how to most effectively use this creative control.
By the way, for those of you interested in how color temperature measurements are determined, here is a brief physics lesson. In you were to take an object physicists call a black body and heat it until it started to glow, the color of the object will be related to how hot it is. The lower temperatures will generate a warm orange glow that will become whiter as the temperature increases. The temperature is measured on a scale known as the Kelvin scale. This is similar to our friendly Fahrenheit scale but is shifted so that 0 degrees Kelvin is the theoretical absolute zero.
While I would not classify myself as a “birder” I often join my wife on birding trips to take photos or collect location information that I can use at a later date. Some birders, particularly the guides, have an uncanny ability to spot birds and recognize them just by their song. In the past, birders used to carry binoculars, scopes and a notebook and pen to record detailed information on sightings and species. Seeing the bird or just recognizing the song was enough to fill out the list of sightings on an honor basis, a sacred principle in the birding community. But I’ve started to see cameras showing up on these trips, maybe 2 or 3 in groups of 10 or 12 for local destinations. Costa Rica is different, though, being a destination country. On a recent trip there this spring in a group of 8 birders 7 carried cameras.
Costa Rica is a “must see” destination for birders and nature photographs alike. It has an incredible diversity of plant and animal life with 894 species of birds found in in three distinct climatic zones and in Reserves and National Parks that occupy 25% of the land area. Local guides provide both birding and photography tours for visitors. In the following paragraphs you’ll find information on the conditions you might encounter and suggestions for photographers and birders on camera equipment you’ll need to get the most out of your trip.
What to consider when selecting a digital camera
Since much of the trip will involve treks through the jungle the size, weight, ISO range, telephoto length and manual adjustment for exposure are key considerations for the equipment you take. The overwhelming consideration, however, is the end use of the photograph. Photographers want pictures with high quality. Birders on the other hand might want photographs purely for identification purposes where high quality is not an issue. I would venture to say, however, that more birders are becoming interested in quality photographs and any tour guide has to be conversant in both subjects. Certainly, on our birding trip a lot of time was devoted to photography instruction.
The cameras carried on our trip were a mixture of digital single lens reflex (DSLR) and “point and shoot” (P&S) equipment that have a small sensor, typically 1/2.3 inches or 6.1 by 4.55 mm. “Crossover” P&S cameras have a full range of manual adjustment controls. Digital technology is a complex subject all on its own so I’ve used a table to summarize the key considerations that relate to the field conditions that we encountered.
Camera and Lens |
Eff. Sensor Resolution, Mp |
Pixel Area, um2 |
Optical Focal Length, mm1. |
Estimated Weight, Camera + Lens, lbs |
DSLR |
||||
Nikon D 800, 200-400 mm, TC 1.4 |
36.3 |
23.9 |
280-560 |
9.92 |
Nikon D300S, 55-300mm |
12.3 |
30.3 |
83-450 |
2.44 |
Canon EOS Rebel XTI, 70-300mm |
10.1 |
32.6 |
112-480 |
2.49 |
Point and Shoot |
||||
Canon Powershot 50X HS |
12.1 |
2.1 |
24-1,200 |
1.21 |
Canon Powershot SX10 IS |
10.0 |
3.1 |
28-560 |
1.20 |
Canon SX110 IS |
9.0 |
3.2 |
36-360 |
0.54 |
I-Phone 5s, scope, tripod |
8.0 |
2.2 |
35-1,000+ |
8.00+ |
Picture quality depends on the number of pixels on the sensor (green) and the pixel area (yellow). While some P&S cameras have an equivalent number of effective pixels to a DSLR these are crammed into the much smaller sensor. Pixels in DSLR sensors are about 10 to 15 times the area of pixels in a P&S sensor. DSLR sensors absorb more light per pixel and are less affected by low light conditions that create noise in the final photo. The difference won’t be visible under full sunlight conditions, but will show up quickly in the jungle when high ISO settings are needed to compensate for low light, long telephotos and smaller apertures. The picture of a Spectacled Owl (Photo1) was taken in low light with the D800 DSLR at ISO 2500 with the camera perched on a light tripod that the guide had brought. Photo 2 was taken at ISO 3200 using a Canon SX50 HS P&S with a moderate telephoto setting. The cropped picture is acceptable for identification as is, but the quality would drop further at longer telephoto settings due to camera shake and smaller apertures that would slow down an already slow shutter speed.
Size and weight (blue) are key considerations in hiking jungle trails. Distances typically are not very long, but the trails are narrow and frequently have significant elevation change. In addition, birders move around in close-knit groups that might be described by a collective noun such as a “knot” or “clutch”. Jockeying for space with a DSLR and a long lens is a problem under these conditions. This is where the P&S with the long telephoto shines. The D800 DSLR with a 200-400mm zoom and a 1.4 teleconverter that I carried weighed in at about 10 lbs. It was heavy sacrifice for quality and I risked clouting someone with the lens in close quarters. The P&S cameras that weigh in at about 8 ounces for the pocket variety to just over a pound are much more manageable.
A few photos were taken through the scope with an I-Phone (or equivalent). By itself the I-phone would appear to be the ideal solution from a weight and size standpoint. But someone has to carry the tripod and scope for spotting and digiscoping. The guide will have a scope, but a quality photograph will require a universal phone adapter to fit over the eyepiece and the patience of the other birders who want to have a look while you set it up. At least, given the distance, the bird is less likely to fly off giving everyone a chance to see it.
Telephoto capability, of course, is essential in bird photography to maintain a sufficient comfort zone between the photographer and the subject and avoid the dreaded words “it flew”. Optical focal length (red) implies a distinct advantage for P&S cameras, notably the Canon Powershot 50X HS which has an optical zoom of 24-1,200 mm. (The numbers in the table are converted to 35 mm equivalent. The actual focal length range is 4.3-215 mm). P&S cameras have long zooms in small packages because of the small sensor size which gives a crop factor of 5.6 or more compared to 35mm. DSLR cameras have smaller crop factors (the D800 has no crop; the D300s is 1.5 and the Rebel is 1.6). So DSLRs need bigger lenses to achieve equivalent magnification. This doesn’t take into account the post-processing crop, however. DSLR photos can be post-cropped to approach or meet the telephoto lengths of P&S cameras with better quality due to larger and more pixels, as in the case of the D800.
Both DSLR and P&S cameras are prone to camera shake which ruins an image. The problem is more acute with P&S cameras operated at the longest focal length. Image stabilization (IS) can minimize the problem to some degree, but the best solution is a tripod, which adds weight.
Other things to consider
Manual adjustments to exposure should be performed with while looking through the camera view finder or the LCD screen. A white snowy egret against a dark green canopy background (Photo 3) will be totally washed out unless exposure compensation (EC) is dialed in. If the bird is flying there is no time to fiddle with the controls. In the Snowy Egret photo I dialed in -1 1/3 stops by pressing the EC button on the D800 with 4 clicks to the left on the main dial while tracking the bird. Performing this operation is much more difficult on a P&S because of the small viewfinder and the tight spacing of manual controls on the small body. Quick adjustments also will be required in the jungle to balance exposure against background sunlight highlights. If quality is the issue it’s important to always expose as close as possible to optimal conditions. It takes a lot of practice and it’s much easier to do with a DSLR than a P&S.
Using flash in bird photography is problematic because of dark backgrounds and “red eye” that washes out the natural eye color. The trick to using flash on a DSLR or a P&S in low light is to dial up the ISO to get an acceptable shutter speed for the ambient light; move the flash unit off camera and dial back the flash output by up to a stop or more to just give a splash of light on the subject. The easiest place to do this is at feeding stations that are set up at hotels or restaurants. I took the Montezuma Oropendola shot (Photo 4) from the hotel balcony using the D800 on a tripod with the flash and a Better Beamer1.mounted on an offset flash attachment2.. The flash exposure was dialed down 1 stop so the flash would not be apparent. The same technique was used to photograph the hummingbird on its nest (Photo 5). A similar setup could be rigged for a P&S with an external flash on the hot shoe that could be used on the trail with less weight. Using flash fill with the Canon Rebel DSLR produced a better photo of the Ghost Bat (Photo 6) than a hand-held shot under ambient light.
Some P&S cameras have view finders, some don’t. Most of the participants in our group with P&S cameras used LCD viewfinders for framing and focusing. DSLR cameras also have LCD screens, but except for video they are mostly used for viewing histograms for exposure evaluation and viewing or editing captured shots. P&S viewfinders are usually electronic (EVF) compared to DSLR viewfinders that are optical reflections from a retractable mirror. Personally, I’ve never had much use for EVFs since the best of them is far worse than the poorest optical viewfinder.
A large and clear viewfinder is essential to track a flying bird and get decent shot. The photo of the Magnificent Frigatebird (Photo 7) is an example. I can’t imagine trying to get an equivalent capture using a P&S with an articulated LCD screen.
So what’s the best gear?
So what is the best gear to take for bird photography in Costa Rica? If you’re interested in quality under poor light conditions I would opt for a DSLR with an 80 to 400mm zoom and maybe a 1.4 TC for maximum magnification. That will result in an aperture of f5.6 to f8 at the longest focal length and lower noise under low light conditions than can be achieved with a P&S. The total rig would weigh about 5 lbs., which is heavy, but not unbearable for a long day in the field especially if you have one of those cross-body straps that let’s your camera swing on your hip like a sword3.. You might also consider a light carbon tripod or a monopod that doubles as a walking stick. Monopods in my view though are not much better than hand holding. An external adjustable flash and a Better Beamer extender for subjects more than 50 feet away will complete the setup.
Photos taken with P&S have excellent quality under normal ambient light conditions (Photo 8) even at the super telephoto range used in Photo 9. But if you want the best quality in low light and you have manual override, try this
- Turn off the digital zoom. This feature will quickly degrade image quality especially if you are not using a tripod. You can always crop the final image.
- Don’t use the auto feature. The camera will likely select a lower exposure speed (ISO) than is needed. P&S cameras have a much smaller range of apertures than DSLRs and the auto feature will generate a low shutter speed and blurred images if the camera is hand held.
- Set the ISO manually at 800. Set the shutter speed (“S” on a Nikon, “Tv” on a Canon) at the highest value the camera will accept for the light conditions
These settings will provide the best shooting conditions if the camera is hand held. A tripod is a bit of a nuisance when birding in the jungle because space is tight. If the shutter speed setting is still too low use the external adjustable flash with or without the Better Beamer extender.
Another consideration is what type of trip to take –birding or photography. Actually there’s a great deal of overlap as I found on our trip. There are some differences though. Dedicated birders typically want to see and record as many species as possible. On this trip we moved to 6 different locations to bird in in the three climatic zones that host different avian species. Photographers are generally more interested in background setting, wildlife behavior and quality in their photographs and are likely to spend more time at fewer destinations. Whatever the decision, you’ll have a fine time in Costa Rica!
Good birding and good shooting!
Footnotes
- The Better Beamer attachment concentrates the external flash output by a factor of 2 to 3 times. Use it when the distance to the subject is 30 feet or more and dial down the flash output by 1 stop, less for longer distances. http://www.naturescapes.net/store/better-beamer-flash-extenders/
- Really Right Stuff has an incredible array of custom camera brackets. The URL is: http://www.reallyrightstuff.com/s.nl/sc.26/category.3/it.C/.f
- The cross-body strap relieves the weight on the neck and shoulder, allows rapid retrieval of the camera for a quick shot and works well under the back strap of binoculars. The URL is: http://www.blackrapid.com/products/curve
Photo Gallery
 Spectacled Owl |
 Montezuma Oropendola |
 Violet –headed Hummingbird |
 Spot-breasted Oriole |
 Magnificent Frigatebird |
 Hoffman’s Woodpecker |